Wedding Dress – Lining

So now my wedding dress is underway and I have begun by sewing the lining which I am going to use to fit the dress. I have decided to do French seams throughout to add a neat look to every layer.

Here is the lining dress on my manequin.

lining front lining back

I have decided to leave the back open instead of using stretch illusion since I am very pale and the illusion fabric is usually made for ballroom dancing where fake tan is the name of the game. I have also moved the closure to an invisible zipper under the arm which I will sew in by hand when the lining and outer layers are attached.

So far, I love this pattern and the fit is good. The only thing I will alter is the neckline which can come a little lower. Oh and the length! This dress pattern seems to have been made for an Amazon and not someone who is 5’4″ and likes wearing flats! My mannequin is curently set at a shoulder height of about 5’6” and the dress is still scrunched on the ground.

My version of Katie Betty’s Liberty skater skirt

So, since minerva crafts started their blogger network I have been following every make and when I saw Katie Betty’s skater skirt in a fabulous stars and stripes print I couldn’t wait to get the kit!

I started with the fabric folded in half to get the length.

stars and striped fabric

In hindsight, I could have taken it a bit shorter but I knew I wanted the skirt to sit on my waist and it is always better a wee bit long than a wee bit short!

I folded over a nice wide waistband to thread the elastic through.

sewing the waistband


It took no time at all to make up, I think I was done in about an hour and it looks great.

Here is it teamed with my New Rock boots and black tights.

finished skirt


Wedding dress – completely changed my mind!

So since my last post I have completely changed my mind about the type of wedding dress I will be making.

I decided to go for something more long and sleek. Long means I can wear converse trainers with my dress!

I have gone for Butterick 5779B5779fx

Although I don’t think it will look much like that when it is finished. I am choosing the sleeveless version since our wedding is in July although I might add long draping LOTR-esque sleeves that are open to the shoulder to add more drape and flow since I don’t plan on having a long veil.

I am using the silk lining to make a toile which I will fit and then make the dress the same. I have a lovely yellow lace for the motifs.

yellow-lace-belinda

The main body of the gown is a lovely white silk satin which falls beautifully and is as light as a feather. I am in the process of cutting out all the pieces although I don’t have a large enough cutting table so I am having to cut on the floor. Anyway, watch this space for more wedding dress updates!


Exciting news and massive new project

So, First thing I want to say is sorry for the massive blackout in posts recently, I have been so busy away from my sewing machine! The big news is that I just got engaged! I’m so excited and just like any creative person would be, I am elbow deep in wedding planning already. For an avid amateur dressmaker the prospect of a wedding means something massive. It means the chance to design and make my wedding dress (I know some people say it’s bad luck but I would hate having to wear a shop bought dress on one of the biggest days of my life).

After browsing some bridal catalogues and getting an idea of what kind of dress I might like I decided that strapless and tea-length were my two key wants in the dress. I also wanted silk because it is going to be a summer wedding and I don’t want to be sweating away in a synthetic fabric dress!

Normally I stick to Vogue patterns because I prefer their fit but I just couldn’t find anything girly enough in their formal range (it was all a bit to sleek) so I am going to start with SImplicity 3878 in view D (the one in the photo).Image

The colour scheme for our wedding is yellow and purple (blueberries and custard as my mum would say!) so I am wanting to have white dress with a yellow lace overlay but I’m still looking for a good balance between quality and price in terms of lace!

If any readers have ever made a wedding dress I would love to hear their experiences in takling the nicest dress a girl ever gets to wear!


Foray into Cosplay – Queen Amidala headdress

When making clothes I always draw on my passions for fantasy and science fiction, sometimes even creating my own characters like a Neptunian mining manager or a cyberpunk bio-hacker. Now I am going to go one step further and delve into the world of science fiction and fantasy emulation by way of cosplay!

My last cosplay creation was Seven of Nine for Destination Star Trek London last year. I made a silver catsuit and papier mache cortical implants:

7of9-1 7of9-2

Getting to meet some of my Star Trek heroes and getting complements from other fans made this one of the best weekends ever!


Now I am switching franchise and heading off to Star Wars. I am going to make a copy of Queen Amidala’s red invasion outfit, starting with the headdress.

Padmé Amidala's first appearance in Star Wars ...

Padmé Amidala’s first appearance in Star Wars Episode I: The Phantom Menace (Photo credit: Wikipedia)

No real person has hair long and thick enough to become part of the headdress (and if you read the rest of my blog you know I certainly don’t) so I have ordered a wig for the long pigtail at the back and hair extensions for the coil over the head. I intend to pad out this coil with a length of foam tube from a swimming “noodle” and make the rest in papier mache with embelishment.


This will probably be one of the biggest not purely sewing projects I have ever undertaken and I am raring to get going. I hope to post images and a detailed account of every step as I get to work!

Geoffrey Beene jumpsuit and shirt

Now we are in the last week of August, I am packing away the poplin and the summer dress patterns and looking for something to set the tone for my autumn wardrobe. I really like clothes with plain straight lines in lovely fabrics as the weather starts to turn colder and you have to start planning what jacket to wear with everything.

I found this fantastic pattern from Geoffrey Beene for sale on Etsy (I think it is out of print now)

Image

I love the low back combined with the smart straight trousers on the jumpsuit and I know that the square cut shirt is sure to become a wardrobe staple of mine as I am always looking for a baggy top to throw over jeans.

I chose a suiting fabric which I got for £2.99/m online which I expected to end up looking quite flimsy but it has really beautiful drape which will be great for the pleats in the jumpsuit.

Image

I don’t know how well it has come out in the picture but it is actually a very fine beige and black tweed that gives an overall grey look.

So far I have just been cutting out the pieces. The jumpsuit is just two main pieces (I don’t think I have ever had to cut out such large pattern pieces).

Image

I can’t wait to see how it makes up! I’ll keep you posted on progress…

Pattern Review – Vogue 1248

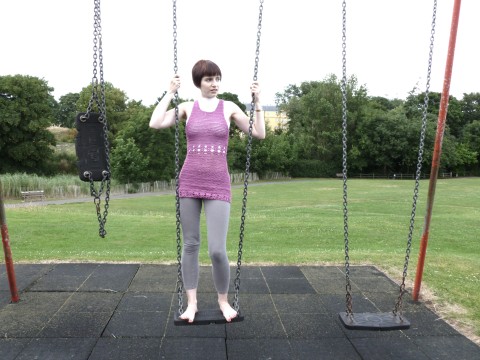
Sorry for the lack of posts for a while I have been away from my sewing machine on holiday! I return with a review of this fabulous pattern Vogue 1248 which I made for the second time shortly before going away.

Image

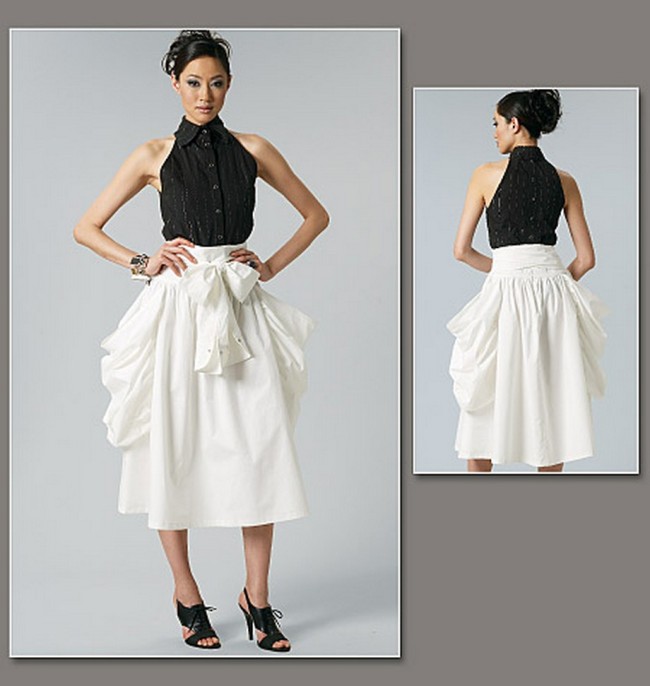
This pattern is by Andrea Katz and is in my opinion a fabulous balance of eye catching shape and practicality.

The pattern was classified as advanced (the first time I had attempted such a pattern) but it really wasn’t too difficult at all. I made the whole outfit in black linen earlier in the year to wear to give a seminar while on a research visit and just recently I made it again in white cotton as a great summer outfit.

The hardest part of this pattern in my opinion is the collar. It has three layers on top of the base and is also quite high making it quite bulky and hard to do up if you are not a giraffe! I adjusted for this when making it for the second time and removed the interfacing in the collar sections (the thickness of the fabric is enough to keep it in place).

The long pronged snap fastenings on the shirt are a fun feature (I have never had to take a hammer to my sewing before) but they really give it a professional edge.

The skirt is the conversation piece of the outfit. The belt/sash is made to look like the sleeves of a shirt tied round the waist which adds an artistic edgy feel to the look. The way they wrap around the waist several times before tieing at the front or the back are reminiscent of a japanese kimono.

My favourite part of the skirt ar the pockets. Instead of being stitched to the outside of the skirt on completion, they are incorporated as a separate section where first a bag is made and then stitched into the opening left on the side of the skirt. It is a neat construction and leaves a polished finish.

Overall I have to say that this is one of the best patterns I have ever made up and would recommend it to anyone!

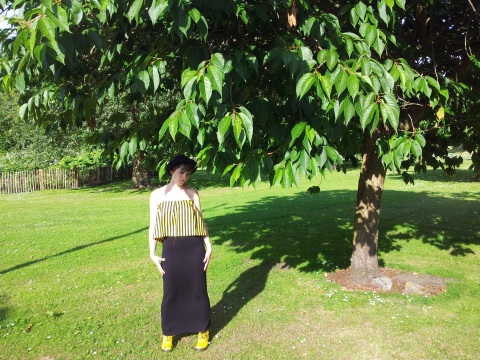
Here is a picture of me in the white cotton version of the skirt whilst on holiday this year:

Image

Crochet dress completion

It took time (although not as long as I thought) and perseverance (although not as much as I thought, except the part where I made a mistake and had to unravel 20 rows!) but the dress is finally done! I didn’t put on the collar as I felt it was too fussy and with the yarn I had used I thought I would have great difficulty getting it over my head. I did some rather extensive blocking to stretch the dress into an appropriate size and I still think it is more of a tunic (clearly I am not as bold as a girl from the 60s!)

blocking crochet dress

I think it has come out rather well! It certainly preserves the 60s/70s aesthetic and the colour is bang on trend both for the SS13 and AW13 collections on the catwalk.

P1000549-2 P1000552-2 P1000548-2

Return from internet blackout and ‘Neat Pleats’ completion

Sorry for the long break in posting, I have been moving house and hence have had to contend with the usual switch-over time before getting the phone line up and running!

In the meantime I have been busy sewing and creating and I have completed my pleated top in time for the sun to come out!

I decided to have a one inch pleat about every four inches, although I followed the stripes in the fabric rather than the exact measurements. I decided to line the top with a yellow viscose jersey (very stretchy) to make it secure (very important in a strapless top). I calculated the stretch in the jersey and cut it so that it would fit over my shoulders when completely stretched.

P1000530

I pressed the pleats into the striped fabric before beginning and then hemmed the bottom by hand and pressed it again.

P1000532

I attached the lining and top together and added a snap fastening for the striped fabric as it has no stretch to it.

I love the way it turned out although if I were to make this again I would use bigger pleats to give a more flared look!

20130709_180324 20130707_153152 20130709_180211

Neat Pleats – Designer Inspiration

In April I was going away and so I treated myself to a copy of Vogue to read on the plane. I love leafing through the glossy pages and the UK April edition had some fantastic editorials. I have read that issue so many times now and every time I read it I get more inspiration! Since April I have bought a couple more issues but they are not so beautiful as that edition.

P1000529

In the editorial entitled “Plain Song”. They explore soft clean white and neutral lines and I fell in love with this top here by “JW Anderson”.

P1000526

I had recently purchased some striped yellow and black fabric and I think this could be perfect for making a similarly pleated boob-tube.

P1000528

I am going to have the stripes lying up and down parallel to the pleats and inside I will face the top with some jersey fabric to add a bit of extra fit. I haven’t quite decided on the type of fastening to use at the back but I will probably go for a few large poppers. The fabric should probably be opaque enough to do a single thickness top (as long as it is worn with a bra that is!) but I will have to see. I will experiment with the width of the pleats but currently I am planning on having two inch pleats every four inches around. I’ll keep you posted!